Jacking Instructions
Jacking Instructions
1) Place the vehicle on level, hard ground.
2) Set the parking brake firmly and shift into “P” (Park) if your vehicle has an automatic transmission, or shift into “R” (Reverse) if your vehicle has a manual transmission.
3) Turn on the hazard warning flasher if your vehicle is near traffic.
4) Block the front and rear of the wheel diagonally opposite of the wheel being lifted.
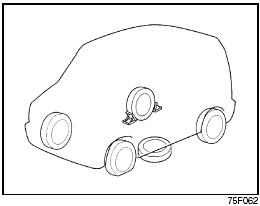
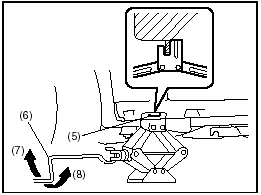
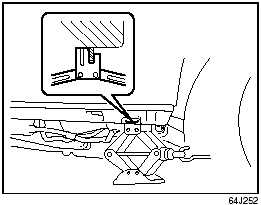
5) Place the spare wheel near the wheel being lifted as shown in the illustration in case that the jack slips.
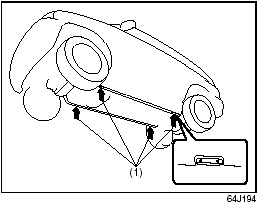
(1) Jacking point
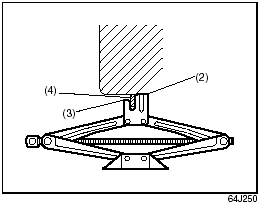
(2) Upper flat surface
(3) Lower flat surface
(4) flange of the body
6) Position the upper flat surface (2) of the jack at the inside of the underbody flange as shown in the illustration.
Front
(5) Designated jacking point
(6) Jack handle
(7) Raise
(8) Lower
Rear
7) Position the jack vertically and raise the jack by turning the jack handle clockwise until the jack head recess fits around the flange at the designated jacking point as shown in the illustration.
8) Continue to raise the jack slowly and smoothly until the tire clears the ground. Do not raise the vehicle more than necessary.
 WARNING:
• Use the jack only to change wheels
on level, hard ground.
• Never jack up the vehicle on an inclined surface.
• Never raise the vehicle with the jack in a location other than the designated jacking point near the wheel to be changed.
• Make sure that the jack is raised at least 51 mm (2 inches) before it contacts the flange. Use of the jack when it is within 51 mm (2 inches) of being fully collapsed may result in failure of the jack.
• Never get under the vehicle when it is supported by the jack.
• Never run the engine when the vehicle is supported by the jack and never allow passengers to remain in the vehicle.
See also:
Headlight Aiming
Since special procedures are required, we
recommend you take your vehicle to your
SUZUKI dealer for headlight alignment. ...
Theft Deterrent Light
Theft Deterrent Light
This light will blink with the ignition switch
in the “OFF” or “ACC” position. The blinking
light is intended to deter theft by leading
others to believe that the v ...
Maintenance Schedule
The following table shows the times when
you should perform regular maintenance
on your vehicle. This table shows in miles,
kilometers and months when you should
perform inspections, adjustments, ...