Folding Rear Seats (SX4)
The rear seats of your vehicle can be folded forward to provide additional cargo space.
To fold the rear seats forward:
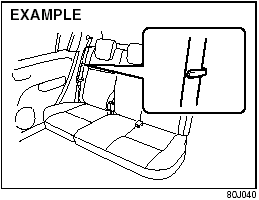
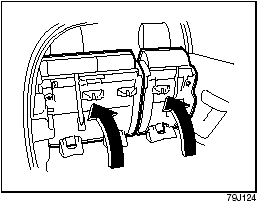
1) Hook the webbing of the outboard lapshoulder belts in the belt hangers.
CAUTION:
• When you move a seatback, make
sure the belt webbing is hooked in
the seat belt hangers so the seat
belts are not caught by the seatback,
seat hinge, or seat latch. This
helps prevent damage to the belt
system.
• Make sure the belt webbing is not twisted.
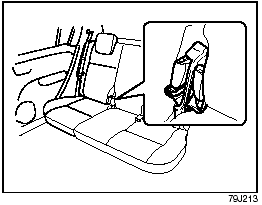
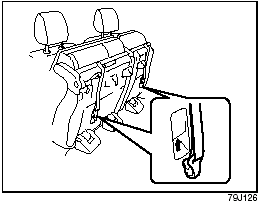
2) Stow the seat belt buckles of the center and right seating position as shown in the illustration.
CAUTION:
When you fold the rear seatback forward,
stow the seat belt buckles of
the center and right seating position
into the seat first. This helps prevent
being caught by the seat and being
damaged.
3) Lower the adjustable head restraint fully.
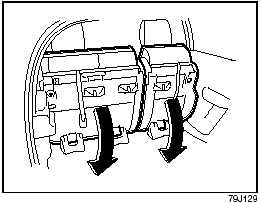
4) Pull the release lever on the top of each split seat, and fold the seatbacks forward.
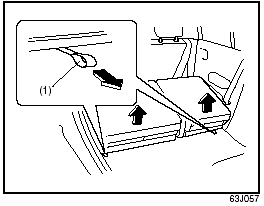
5) Pull the lock release strap (1) rearward to unlatch the seat cushion.

WARNING:
When you unlatch the rear seat cushion,
be careful that your face or
hands are not injured from the seat
popping up.
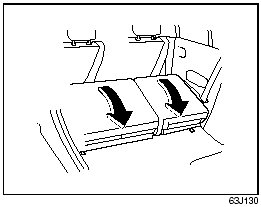
6) Fold the entire seat forward.

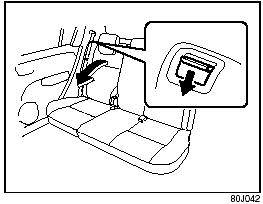
7) Push down the adjuster (2) to make the strap slack, and then unhook the strap by pushing down the hook (3).

8) Hook the strap (4) to the front seat head restraint as shown in the illustration.
CAUTION:
When securing the folded rear seat
with a strap, adjust the strap length
so that the rear seat will not move.
WARNING:
Luggage or other cargo should be
stowed in the luggage compartment
with the rear seat in an upright position,
whenever possible. If you need
to carry cargo in the passenger compartment
with the rear seat back
folded forward, be sure to secure the
cargo or it may be thrown about,
causing injury. Never pile cargo
higher than the seatbacks.
To return the seat to the normal position, follow the procedure below.
1) Unhook the strap from the head restraint and stow the strap to the back of the seat cushion as shown in the illustration. Make sure to adjust the strap length to avoid any slack or twist.
2) Pull down the seat cushion until it locks into place.
WARNING:
When returning the rear seat cushion
to the normal position, be careful that
your finger is not caught between the
lock and the floor.
CAUTION:
• When returning the rear seat cushion
to the normal position, make
sure that there is nothing around
the striker. This prevents the seat
cushion from being locked
securely.
• When returning the rear seat cushion to the normal position, make sure that there is nothing under the seat cushion. This prevents damage to the seat cushion.
3) Raise the seatback until it locks into place.
After returning the seat, try moving the seat and seatback to make sure they are securely latched.
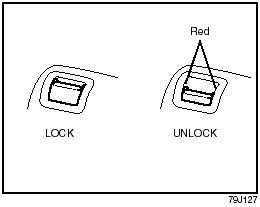
CAUTION:
After securing the rear seatback,
make sure that it is locked securely. If
it is not, you will see red in the
release lever.
See also:
Windshield Washer Fluid
Check that there is washer fluid in the tank
by looking at the washer fluid level gauge
which is attached to the cap of the washer
fluid tank. If the fluid level is near “E” mark,
refill i ...
Specifications
NOTE:
Specifications are subject to change without
notice.
4WD: 4-wheel drive.
2WD: 2-wheel drive.
M/T: Manual transmission.
A/T: Automatic transmission.
...
Exterior
The hood, front fenders, grille, bumpers and tailgate are exclusive to
Suzuki. The bed comes with a factory spray-on bedliner and an adjustable
tie-down system. The prominent Suzuki badge on the h ...