Jacking Instructions
Jacking Instructions
1) Place the vehicle on level, hard ground.
2) Set the parking brake firmly and shift into “P” (Park) if your vehicle has an automatic transmission, or shift into “R” (Reverse) if your vehicle has a manual transmission.
3) Turn on the hazard warning flasher if your vehicle is near traffic.
4) Block the front and rear of the wheel diagonally opposite of the wheel being lifted.
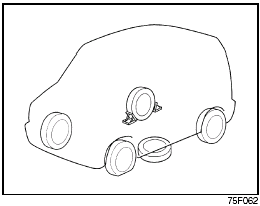
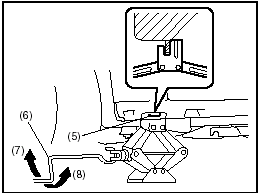
5) Place the spare wheel near the wheel being lifted as shown in the illustration in case that the jack slips.
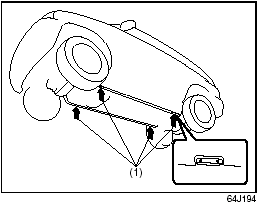
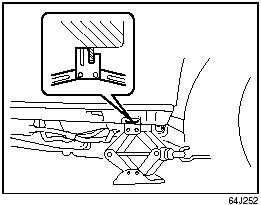
(1) Jacking point
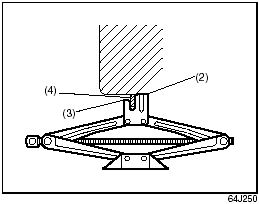
(2) Upper flat surface
(3) Lower flat surface
(4) flange of the body
6) Position the upper flat surface (2) of the jack at the inside of the underbody flange as shown in the illustration.
Front
(5) Designated jacking point
(6) Jack handle
(7) Raise
(8) Lower
Rear
7) Position the jack vertically and raise the jack by turning the jack handle clockwise until the jack head recess fits around the flange at the designated jacking point as shown in the illustration.
8) Continue to raise the jack slowly and smoothly until the tire clears the ground. Do not raise the vehicle more than necessary.
 WARNING:
• Use the jack only to change wheels
on level, hard ground.
• Never jack up the vehicle on an inclined surface.
• Never raise the vehicle with the jack in a location other than the designated jacking point near the wheel to be changed.
• Make sure that the jack is raised at least 51 mm (2 inches) before it contacts the flange. Use of the jack when it is within 51 mm (2 inches) of being fully collapsed may result in failure of the jack.
• Never get under the vehicle when it is supported by the jack.
• Never run the engine when the vehicle is supported by the jack and never allow passengers to remain in the vehicle.
See also:
Before Driving
...
Automatic Heating and Air Conditioning System (Climate Control)
Air Outlet (front)
1. Windshield defroster outlet
2. Side defroster outlet
3. Side outlet
4. Center outlet
5. Floor outlet
Center outlet
Side outlet
When “Open”, air comes out from t ...
Maintenance Recommended under Severe Driving Conditions
If the vehicle is usually used under the conditions corresponding to any
severe condition code given below, it is recommended that applicable
maintenance operation be performed at the particular in ...