Seat Adjustment
 WARNING:
Never attempt to adjust the driver’s
seat or seatback while driving. The
seat or seatback could move unexpectedly,
causing loss of control.
Make sure that the driver’s seat and seatback are properly adjusted before you start driving.
WARNING:
To avoid excessive seat belt slack,
which reduces the effectiveness of
the seat belts as a safety device,
make sure that the seats are adjusted
before the seat belts are fastened.
Adjusting Seat Position
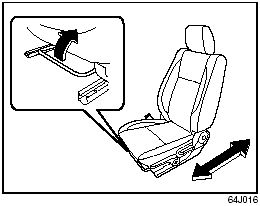
Front seat
The adjustment lever for each front seat is located under the front of the seat. To adjust the seat position, pull up on the adjustment lever and slide the seat forward or rearward. After adjustment, try to move the seat forward and rearward to ensure that it is securely latched.
If the driver’s seat is equipped with a seat height adjuster lever on the outboard side of the seat, raise or lower the seat by pulling up or down the adjuster lever.
Adjusting Seatbacks
WARNING:
All seatbacks should always be in an
upright position when driving, or seat
belt effectiveness may be reduced.
Seat belts are designed to offer maximum protection when seatbacks are in the upright position.
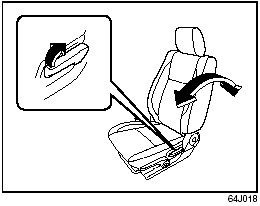
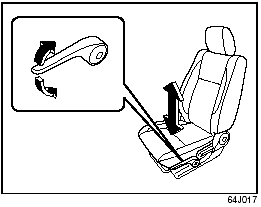
Front seat
To adjust the seatback angle of front seat, pull up the lever on the outboard side of the seat, move the seatback to the desired position, and release the lever to lock the seatback in place.
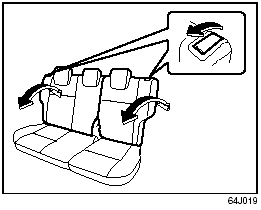
Rear seat
To adjust the seatback angle of the rear
seats:
1) Pull up the lever on the top of a split
folding seat.
2) Move the seatback to one of the lock positions. The number of the lock positions depends on the vehicle specification.
3) Release the lever to lock the seatback in position. After adjustment, try moving the seatback to make sure it is securely locked.
See also:
Heated Rear Window and Heated Outside Rearview Mirrors (if equipped) Switch
Type 1
Type 2
When the rear window is misted, push this
switch (1) to clear the window.
If the driver’s outside rearview mirror has
the mark (2), it is also equipped with the
heated outs ...
Instrument Panel
...
Highway Driving
When driving at highway speeds, pay
attention to the following:
• Stopping distance progressively
increases with vehicle speed. Apply the
brakes far enough ahead of the stopping
point to allow ...