Information Display
Information Display
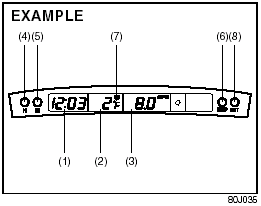
(1) Clock
(2) Thermometer
(3) Instantaneous fuel consumption/Average fuel consumption/Driving range
(4) “H” button
(5) “M” button
(6) “DISP” button
(7) Freezing mark
(8) “SET” button
Clock (1)
The clock is shown when the ignition switch is in the “ACC” or “ON” position.
To set the clock, follow the instructions below.
• To set the hour display, push the “H” button (4) repeatedly to advance the hour display. To advance the hour display quickly, hold in the “H” button (4) for about 1 second and continue holding.
• To set the minute display, push the “M” button (5) repeatedly to advance the minute display. To advance the minute display quickly, hold in the “M” button (5) for about 1 second and continue holding.
Thermometer (2)
The thermometer shows the outside temperature when the ignition switch is in the “ON” position.
If the outside temperature nears freezing, the mark (7) will come on when the display shows the outside temperature.
NOTE:
The thermometer will not indicate the
actual outside temperature when driving at
low speed, or when stopped.
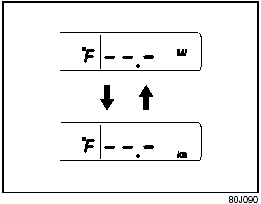
You can change the unit indication of the thermometer between °F and °C.
To change the indication, follow the instructions below.
1) Hold in the “SET” button (8) for more than 2 seconds.
The unit display of the thermometer will blink.
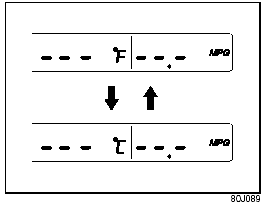
2) Push the “SET” button (8) quickly to change the indication between °F and °C as shown in the illustration.
3) Hold in the “SET” button (8) for more than 2 seconds, and the unit indication will stop blinking.
If you don’t push the “SET” button (8) within about 8 seconds after the unit display starts blinking, the unit display will automatically stop blinking.
Fuel Consumption and Driving Range (3)
This display can be changed to show instantaneous fuel consumption, average fuel consumption, or driving range. Also, the display of fuel consumption can be turned off if you desire.
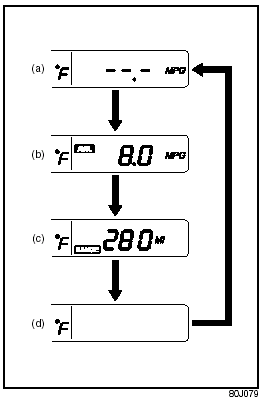
Every time you push the “DISP” button (6), the display will be changed among the following four displays.
(a) Instantaneous fuel consumption.
(b) Average fuel consumption.
(c) Driving range.
(d) No display.
Instantaneous fuel consumption (a)
If you selected instantaneous fuel consumption the last time you drove the vehicle, the display indicates “--.-” when the ignition switch is turned to the “ACC” or “ON” position. Unless the vehicle is moving, the display will indicate “--.-”.
Average fuel consumption (b)
If you selected average fuel consumption the last time you drove the vehicle, the display shows the last value of average fuel consumption when the ignition switch is turned to the “ACC” or “ON” position.
Unless you reset the value of average fuel consumption, the display will show the value of average fuel consumption which includes average fuel consumption during previous driving.
To reset the value of average fuel consumption, hold in the “DISP” button (6) for more than 2 seconds when the display shows an average fuel consumption value.
The display will indicate “--.-” and then will show a new average fuel consumption value after driving for a short time.
Driving range (c)
If you selected driving range the last time you drove the vehicle, the display shows “-- .-” for a few seconds and then shows the current driving range when the ignition switch is turned to the “ON” position.
The driving range shown in the display is the approximate distance you can drive until the fuel gauge indicates “E” based current driving conditions.
When the remaining fuel in fuel tank reaches a low level, the display “--.-” will appear.
If the low fuel warning light comes on, fill the fuel tank immediately regardless of the value of driving range shown in the display.
As the driving range after refueling is calculated based on the last driving condition, the value is different each time you refuel.
NOTE:
• When you reconnect the negative (-) terminal
to the battery, the value of driving
range will be shown after driving for a
while.
• For a new vehicle with low mileage, the driving range may not be shown promptly in the display when begining to drive. The driving range will be shown after a while.
NOTE:
The values of fuel consumption and driving
range shown in the display are affected by
conditions such as the following;
• road condition.
• surrounding traffic condition.
• driving condition.
• vehicle condition.
• when the malfunction indicator light comes on or blinks.
Unit indication of fuel consumption and driving range
You can change the unit indication of fuel consumption when selecting instantaneous fuel consumption or average fuel consumption in the display.
You can also change the unit indication of driving range when selecting driving range in the display.
To change the unit indication in the display, follow the instructions below.
You should operate the display before the vehicle moves.
1) Hold in the “SET” button (8) for more than 2 seconds.
The unit display of the thermometer will blink.
2) Push the “M” button (5), and the unit display of fuel consumption (or driving range) will blink.
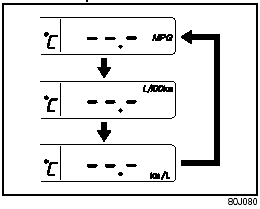
Fuel consumption
Driving range
3) Push the “SET” button (8) quickly to change the indication as shown in the above illustrations.
4) Push the “SET” button (8) for more than 2 seconds, and the unit display will stop blinking and the display will stay on. If you don’t push the “DISP” button (6) within about 8 seconds, the unit display will automatically stop blinking and the display will stay on.
NOTE:
“MPG” is based on US gallons.
NOTE:
When you reconnect the negative (–) terminal
to the battery, the information display
will be reinitialized. Readjust the display. If
you select driving range, the display will be
shown after driving for a while.
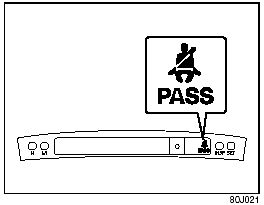
Front Passenger’s Seat Belt Reminder Light
The front passenger’s seat belt reminder light is located in the information display. If there is a passenger in the front seat and the front passenger’s seat belt is unbuckled about 10 seconds after the ignition switch is turned to the “ON” position, this light will come on and then blink. When the light comes on, a buzzer will also sound intermittently for about 6 seconds. The reminder will repeat several times under certain conditions until the front passenger’s seat belt is buckled. After repeating several times, the reminder will be canceled even if the front passenger’s seat belt remains unbuckled.
For details about the seat belt reminder, refer to “Seat Belts and Child Restraint Systems” in the “BEFORE DRIVING” section.

WARNING:
It is absolutely essential that the
driver and passengers wear their seat
belts at all times. Persons who are
not wearing seat belts have a much
greater risk of injury if an accident
occurs. Make a regular habit of buckling
your seat belt before putting the
key in the ignition.
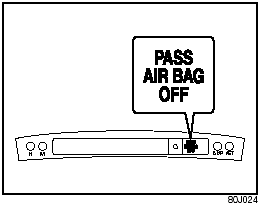
“PASS AIRBAG OFF” Indicator
The “PASS AIRBAG OFF” indicator is located on the information display. When the ignition switch is turned to the “ON” position, this indicator comes on for several seconds to let you know the indicator is working.
This indicator will come on and remain on when the front passenger sensing system has turned off the front passenger’s air bag.
For details about the front passenger sensing system, refer to “Supplemental Restraint System (air bags)” in the “BEFORE DRIVIING” section.
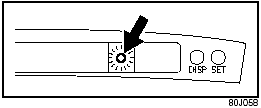
Theft Deterrent Light
This light will blink with the ignition switch in the “OFF” or “ACC” position. The blinking light is intended to deter theft by leading others to believe that the vehicle is equipped with a security system.
See also:
Information Display
Information Display
(1) Clock.
(2) Thermometer.
(3) Instantaneous fuel consumption/Average fuel consumption/Driving range.
(4) “H” button.
(5) “M” button.
(6) “DISP” button.
(7) F ...
Clutch Pedal
Clutch Pedal
Check the clutch pedal for smooth operation
and clutch fluid level from time to time.
If clutch dragging is felt with the pedal fully
depressed, have the clutch inspected by
your S ...
Assist Grips (if equipped)
Assist Grips (if equipped)
Assist grips are provided for convenience. ...